Monday, February 11, 2013

My Skincare Routine

I've always had nice skin. I was never plagued with acne, except for the very-occasional pimple on my nose. I don't have any special tips. In fact, when I was younger I had no skin regimen. I never used moisturizer, a special face wash, masks, or astringent and only washed my face in the shower.

Then again, I also never used makeup. 

I guess my childhood skincare"secret" tip is that I generally left my face alone. I didn't use any harsh chemicals or treatments, so my skin was never stripped or messed with. Now that I use makeup, however, it's more important to have a skincare routine in place.

I use makeup daily. This means I have to have a skincare routine in place to take care of my skin. Why? Well, in order to have a good painting you have to have a clean canvas. It might be easier to skip washing your face after a long night of partying or to go straight to foundation without using some primer first, but your skin is not going to look nice if you don't take care of it.

{Daily}

Morning skincare routine -AM

  1. STEP 1: Wash face - Fresh Soy Face Cleanser
  2. STEP 2: Tone - Boots Botanics Complexion Toner 
  3. STEP 3: Treat - Sephora Instant Depuffing Roll-on Gel
  4. STEP 4: Moisturize - Lancome Multi-vial moisturizer, Smith's Rosebud Salve
My AM skincare routine is pretty quick. I start off with a very light cleanser; Fresh's Soy Face cleanser. Although my face might feel oilier at times, I've found that starting off with a harsher cleanser leads to my skin drying out and that's never a good thing!

Toner helps to restore your skin's pH levels, so that you can apply moisturizer and have it sink in right away. It also helps to remove whatever might've been left on your skin. I use Boots Botanics Complexion Toner.

I don't sleep a lot, so unfortunately I have dark under-eye circles and sometimes puffy eyes. I'm currently trying to treat this using Sephora's Instant Depuffing Roll-on Gel. The rolling action of this gel is supposed to help stimulate the area and help to depuff the eyes. I'm also working on getting more sleep!!!

To moisturize, I use Lancome's Multi-vial moisturizer. For my lips (because lips need love, too!!) I use Smith's Rosebud Salve.

I'm then ready to apply makeup or get started with my day!

Nighttime skincare routine -PM
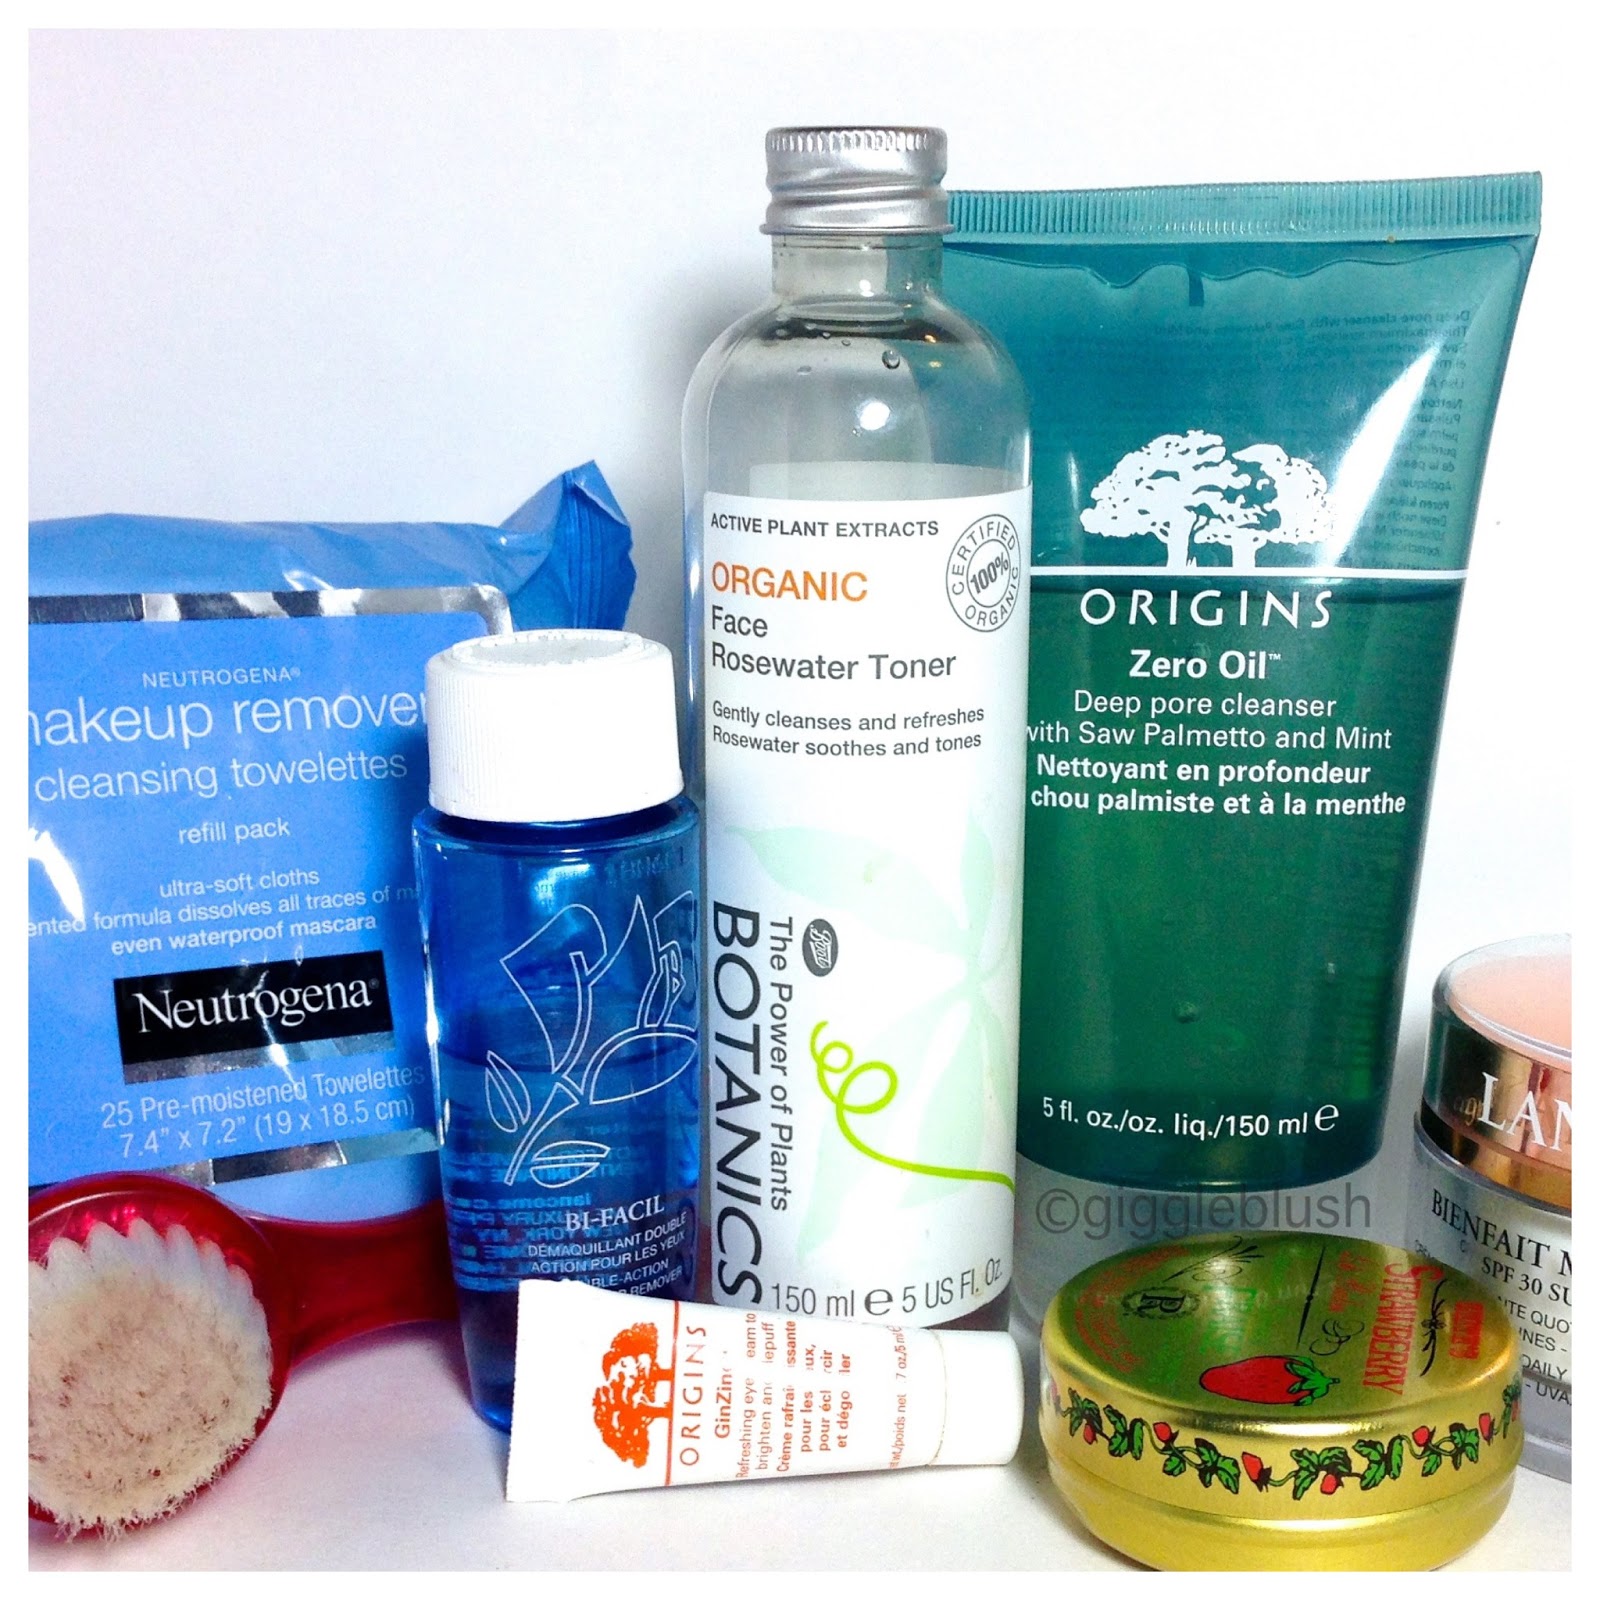

  1. STEP 1: Remove eye makeup - Lancome Bi-Facil eye makeup remover
  2. STEP 2: Remove face makeup - Neutrogena makeup removing wipes
  3. STEP 3: Wash face - Sephora face complexion brush, Origins Zero Oil deep pore cleanser
  4. STEP 4: Tone - Boots Botanics Complexion Toner
  5. STEP 5: Treat - Origins GinZing
  6. STEP 6: Moisturize  - Lancome Multi-vial moisturize, Smith's Rosebud Salve

I start my PM routine by removing any makeup I wore throughout the day. I've found the best way to do this is by starting with the eyes and then moving on to the face. I remove my eye makeup with Lancome's Bi-Facil and then remove the rest of my face makeup using one face wipe. I'm currently using Neutrogena's makeup removing wipes, but I usually use baby wipes for this.

I keep very active working at my preschool, so at the end of those days my skin might be a bit oilier than usual. For these days, or for days when my skin needs a bit more deeper cleansing, I'll use my Origins Zero Oil deep pore cleanser so my skin is completely refreshed.

After applying toner to balance my skin, I follow with a different under-eye moisturizer. I wanted to use something a bit more heavy-duty for nighttime so I've been trying out a few different under-eye moisturizers. I'm currently using Origins GinZing (hopefully this helps with my dark circles). Afterwards, I slather on some of my AM moisturizer, Lancome's Multi-vial moisturize and some of that Smith's Rosebud Salve.

I usually have some downtime after my routine, so that I can relax before sleep. Turning on some music before bed is the best way to let go of the morning stress.


{Weekly} 

Once-a-Week skincare routine:
  1. STEPS 1-3 of PM Routine
  2. STEP 4: Wash face - Origins Zero Oil deep pore cleanser
  3. STEP 5: Exfoliate - St. Ives Blemish Control Apricot scrub, LUSH Sweet Lips Scrub
  4. STEP 6: Tone - LUSH Toner Tab in Dream Steam
  5. STEP 7: Mask - (varies) Mask of Magnaminty 
  6. STEP 8: Treat - Sephora Instant Depuffing Roll-on Gel
  7. STEP 9: Moisturize - Lancome Multi-vial moisturize, Smith's Rosebud Salve
Once a week, I add a few more steps to my routine. Even after cleansing regularly, the skin develops a buildup of ickness that requires different products to remove. Personally, (TMI alert!) I have a problem with blackheads on my nose area. I've tried lots of different products that haven't quite worked out, so I'm always on the lookout for something better. 

For my weekly routine, I use the same products from my PM routine, except for a few additions: face scrub, lip scrub, and a face mask. They help polish my skin and lips before and remove any excess dirt, oil, and dead skin. I'm currently using St. Ives Blemish Control Apricot scrub. I thought I would try this out to see if it would help get rid of some blackheads (I haven't seen a change yet). I also use LUSH's Sweet Lips Scrub, which you can actually eat after using (mine is chocolate flavored)!

I use LUSH's toner tab in Dream Steam right before applying my mask. The toner tab helps remove any leftover face gunk (nice). To use one, you boil some water, plop this in and steam your face over the pot/bowl. Steaming your face helps to open your pores so that whatever mask you use can get a better clean. 

TIP: Remember, warm opens pores and cold closes them!

I like Dream Steam, because its smell is very relaxing. Siting over a pot of boiling water is not very comfortable, but with this great smelling toner tab, I can just sit and relax. 

Using a face mask after this helps remove anything beneath the top layer of my freshly cleansed skin. Simply removing what's on the surface won't be enough after a while, because what's beneath will continue to build up. I use a variety of face masks, depending on what I think my skin needs at the time.  This month, I've been using LUSH's Mask of Magnaminty. Mask of Magnaminty is similar to other mud masks in that it helps clear out your pores (are you starting to see a pattern in my products?). After the mask dries, I use COLD water to remove it.

I then follow with my usual AM/PM Moisturizing routine. 


What's your skincare routine? Do you have any special tips or tricks for keeping your skin clean?

-Claudia

Sunday, February 10, 2013

FOTD - Valentine Sparkle

Valentine's Day is coming up. For a daytime look, this is a bit dramatic. It's better suited for a restaurant or night out. I'm still not sure what my hubby and I are doing. We skip the day-of celebrations and plan for a later night, so that wherever we are, we have a more private night out. 

I actually wore this look out to the mall with my husband. Here's a neat picture of us by the Rainforest Cafe. 

FACE
Embryolisse Lait-Cream Concentre
L'Oreal Lumi Foundation in W6
MAC Fix+
MAC Coppertone
MAC Stereo Rose


EYES
MAC Rubenesque paint pot
MAC Swiss Chocolate + Brick Red
MAC Vibrant Grape (Pro)
MAC Indian Ink
Inglot Pigment 35
Urban Decay eyeliners in Bourbon & Demolition
AVON Glimmerstick in G111 Sugar Plum
Wet n Wild eyeliner in 650D Purple
Wet n Wild Petal Pusher palette, right crease shade


LIPS
Maybelline Hooked on Pink


What are your Valentine's Day plans? Do you celebrate the day or are you an Anti-Valentiner?

-Claudia

Thursday, February 7, 2013

Recent Face Charts

I wanted to show you guys some of the face charts I've created. Since I realized I don't have many people to practice my skills on, I decided to practice using face charts. I purchased some textured paper from Michael's and printed out a blank MAC face chart I found online.

My face charts have gotten a lot better with practice!

December 28, 2012

This is one of the first ones I worked on. I realize now my problem with this one was lack of depth within the face and brows. I love how the eyes turned out, though. 


December 30, 2012
 I started working a lot more on creating depth and I think it is a huge improvement!!


January 5, 2013
This face chart is based off the Aishwarya Rai FOTD I did a while back. Using eyeliner on paper is a bit more difficult than on skin. 


January 6th, 2013
Here's my attempt at a bridal look. The foundation looks a bit splotchy, because I used a paper that was a bit more textured than the others without realizing it. It's much less noticeable in person. 

You can see the color better in this shot. I think this might be my favorite look!

January 8th, 2013

I'd been wanting to try out a green turned brown look for some time, but it was late at night so I chose to do a face chart instead. I can't wait to wear this look out. I think it came out pretty good! What do you think of the freckles I added?

I wish I could get a better picture of this one! 

January 10, 2013
 I was going for something along the lines of Kristen Stewart's W Magazine cover, but I'm not sure about this one. It still feels unfinished to me. 


Have you ever created your own face charts? Share them below!

Which look was your favorite? If you'd like any info on the charts, comment below and I'll give you the details!

-Claudia

Tuesday, February 5, 2013

FOTD - Cranberry Eyes

Here's a look I did a few weeks ago. I was going for a more red look, but it turned out a bit more plummy. I actually really like how this turned out. It seems a lot more wearable than what I was trying to create. Hope you guys like!

FACE
Embryolisse Lait-Creme Concentre
MAC Pro-longwear Concealer in NW35
Revlon Colorstay in 330 Natural Tan
MAC Coppertone
NARS Orgasm


EYES
Maybelline Color Tattoo in "Pomegranate Punk"
Urban Decay "Last Call" & "Sin" from the Ammo palette
MAC Ambering Rose
MAC Antiqued
Wet n Wild right side crease color from Petal Pusher palette
MAC Brun for brows

LIPS
MAC Honeylove
ModelCo Berry Pink

-Claudia

Monday, February 4, 2013

NOTD - Valentine's Day Nails

Last week, I came across the most ridiculously awesome display inside a Hallmark store:


How could anyone not rush off and buy this little guy?

In honor of this happy little pigglet, I decided to come up with my own Valentine's nail of the day! Hope you guys like.


What I used:
Essie Base Coat
Essie Top Coat
Essie "Petal Pink" (ring finger)
Sinful Colors "Snow Me White"
Zoya "Shelby"
Wet n Wild "429 D - Dreamy Poppy" 
China Glaze "Sex on the Beach"


I was inspired by a few Valentine's nail looks floating out there and, as you can see, I couldn't decide which to go with. On my pointer and pinky fingers, I used nail polish remover to create the heart shape and filled it in with Zoya's "Shelby." I painted my ring finger in the classic french manicure style, except for the two hearts I added. For my middle finger...well, I attempted to paint a bow and arrow. It's a bit off center, haha.

That dreaded left hand of mine:


Here is the main picture that inspired this look:

Posted on is Girlshue.com


What are you doing for Valentine's Day? Did you fall in love with little Cupid, as well??

-Claudia

Saturday, February 2, 2013

Recently Spotted - Urban Decay Event?

I wonder what Urban Decay has planned?


Have you spotted this sign around your local Ulta? Have you signed up?

-Claudia

Friday, February 1, 2013

Obsessive Compulsive Cosmetics - My Lip Tar Collection


Happy February! I wanted to start off the month with yet another round of swatches. This time, I'm going into OCC lip tar territory. OCC (Obsessive Compulsive Cosmetics) lip tars are a cross between lipstick and lipgloss. Lip tars are like long-lasting liquid lipstick. Although they look a bit glossy in my swatches (due to the sun), OCC's lip tars dry to a matte consistency.

When applying lip tars, the term "less is more" is key! It's hard to believe, but you really only need a small dot amount to cover your entire lips.

These lip tars, with the exception of "Feathered," apply beautifully. "Feathered" is a white lip tar that is better suited for mixing than for wearing on its own.

Grandma
Baby coral pink. 


Melange
Neutral light-tan brown


Pretty Boy
Bright, bluer-toned fuschia


Stalker
Classic red with a pop!


Vintage
Deep burgundy red, looks a bit darker in person


Beta
Neutral orange


Hoochie
Off-pink magenta


Feathered
I'm having such a hard time photographing this sucker. "Feathered" is better for mixing and making your other shades lighter. It works wonderfully, just not by itself!


Nylon
Hot light pink, possible Candy Yum Yum dupe!


I'd love to get my hands on basic colored lip tars, such as yellow and blue, so that I could mix more colors.


Price: $16
Where to buy: OCC, Sephora


Do you own any lip tars or do you prefer regular lipstick/glosses? Do you prefer bright or more natural lip colors?

-Claudia

Disqus for Giggle Blush

Pin It button on image hover